Plumbing Book Review
Instructions
Plumbing Level 1 · Blocks A, B, C, and D
Hello! Here’s What You’ll Be Doing
Thank you for helping us review the Plumbing Level 1 books! As Dani mentioned in our Teams chat, we need your help going through the assigned blocks so they are ready to be printed.
We have already reviewed Block A and are currently working through Block B. Along the way, we’ve found a number of common issues that you will likely run into in your assigned block too. This document walks you through each one step by step, please read it carefully before you start!
NOTE: Please be aware that there might be a few more things that need to be fixed so please use your own judgment to identify issues and fix them. Also, if you find a better/efficient way to fix any of the issue please feel free to share it with the group.
| Before You Start: Always check both the Print PDF and the Online Web version after making any changes to make sure everything looks correct in both formats. |
Task 1: Fix Duplicate Links in the Print PDF #
You may notice that some links appear doubled in the print PDF (the same link shows up twice). We have already applied a fix to all blocks, but please double-check your block and let us know if you still see this happening.
| What to do: If you still see duplicate links, investigate further using the code fix from the previous block and reach out to us if you need help. |
Task 2: Fix Glossary Term Links #
Some glossary term links are not working. This happens when the word is bolded or italicized, but the glossary code next to it is not formatted the same way.
The Rule:
- If a glossary word is bolded → the glossary code must also be bolded
- If a glossary word is italicized → the glossary code must also be italicized
- If both → both must match
Please go through all glossary terms in your block and make sure every link is working and clickable.
Here is an example of what correct vs. incorrect formatting looks like:

Task 3: Fix Shaded Textboxes with Icons #
The shaded textboxes that contain icons are not displaying correctly in the print PDF. You will need to fix them manually, one by one, following the format we used in Plumbing Level 2.
| Important: After fixing each textbox, always check both the Print PDF and the Online Web version to confirm it looks correct in both. |
Step 1 — Add the CSS Code #
Make sure the following CSS code is present in both the Web CSS and the PDF CSS sections of your book:
| /* CSS for Symbol/Icon Table from Level 2 books */ .fixed-textbox { display: flex; align-items: center; min-height: 130px; padding: 25px; justify-content: flex-start; } .fixed-icon { flex-shrink: 0; display: flex; margin-right: 20px; align-items: center; justify-content: center; } .fixed-text { flex: 1; display: flex; align-items: center; } |


Step 2 — Update the HTML Structure #
Each shaded textbox must use exactly 3 divs structured like this:
| <div class=”textbox shaded fixed-textbox”> <div class=”fixed-icon”> <img class=”alignleft wp-image-XXXX” src=”URL-TO-YOUR-ICON” alt=”” width=”100″ height=”100″ /></div> <div class=”fixed-text”> “LINE BREAK” Your textbox content goes here. “LINE BREAK” </div> </div> |
Quick Summary of the 3 divs:
- 1st div — class=”textbox shaded fixed-textbox” (the outer wrapper)
- 2nd div — class=”fixed-icon” (contains the icon image, then close this div)
- 3rd div — class=”fixed-text” (contains the text content)
Task 4: Fix the Wolves Image in Acknowledgements #
In the Acknowledgements section, the wolves image was copied and pasted directly into the page. This needs to be fixed properly so it is stored correctly in the Media Library.
Here’s what to do:
- Upload the wolves image to the Media Library in Pressbooks
- Re-insert it into the Acknowledgements page using the uploaded version from the Media Library
- Delete the old pasted version
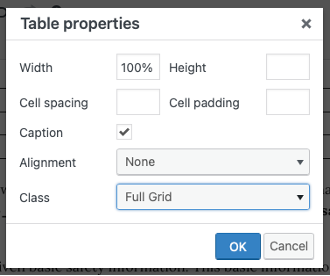
Task 5: Fix Table Widths and Styles #
Some tables have inconsistent widths and heights. Here’s how to clean them up:
- Remove any unnecessary width and height values from table cells (leave them blank)
- If a table needs a width, use 100% as the standard
- Make sure every table has the class “full grid” in the table properties
Task 6: Replace Blue Textboxes with Gray Textboxes #
You may come across some blue textboxes that contain knowledge test questions. These need to be changed to the standard gray textbox format used throughout the book.
Below are examples of the correct gray format to follow:
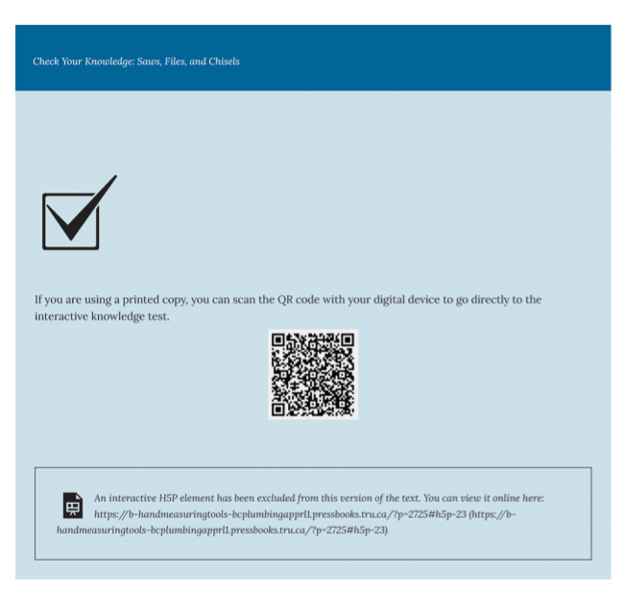

Task 7: Check QR Codes for H5P Activities #
All QR codes linked to H5P activities must point to the student-facing view, not the back-end editor. If a QR code takes you to the editor back-end, you will need to create a new one with the correct link.
How to check:
- Scan each QR code in your block
- Make sure it opens the correct chapter page where the student can view and interact with the H5P
- The correct link format ends with the chapter path followed by #h5p-[number]
- Example: https://b-handmeasuringtools-bcplumbingapprl1.pressbooks.tru.ca/chapter/b-1-1-describe-hand-tools-used-in-the-pipe-trades/#h5p-25
If a QR code is pointing to the wrong place:
- Find the correct student-facing link for that H5P
- Generate a new QR code using that link
- Replace the old QR code in the book
| Tip: The correct link should allow the student to view and interact with the H5P activity without needing to log in to a Pressbooks account. |
Task 8: Fix Oversized Images in the Print PDF
Some images may look perfectly fine in the web version of the book, but appear gigantic when exported to the print PDF. Please use your judgement to identify and resize any images that look too large in the PDF.
| Important: Please use the built-in Custom Image Size feature within Pressbooks to resize images. Do NOT use HTML or CSS to resize them. |
Size Guidelines:
- Most images (photos, diagrams, illustrations) should have a width between 200px and 600px
- In rare cases, an image may go up to 800px — only for images that contain text and are meant to take up a full page in the print PDF
- Icon images should remain at their 100px size (do not resize icons)
How to resize an image in Pressbooks:
- Click on the image in the chapter editor
- Click the pencil / edit icon that appears
- Look for the “Image Dimensions” or “Custom Size” option and enter the desired width
- Export the PDF to confirm the image looks correct at the new size
| Tip: If you are unsure about the right size for an image, aim for a width that looks proportional on a printed page and does not overwhelm the surrounding text. |
Final Checklist — Before You’re Done
Once you have gone through your block, please confirm all of the following:
- Duplicate links in the Print PDF have been checked and fixed
- All glossary term links are working and clickable
- Shaded textboxes with icons look correct in both the Print PDF and Web version
- The wolves image in Acknowledgements has been uploaded to Media and re-inserted
- Tables have been cleaned up with correct widths and the “full grid” class
- Blue knowledge test textboxes have been replaced with the standard gray format
- All QR codes have been scanned and point to the correct student-facing H5P links
- Oversized images in the Print PDF have been resized using the Pressbooks Custom Image Size tool
| Questions? If you run into something not covered here, or you’re not sure how to fix something, please don’t hesitate to reach out to us! |


